To get rid of this warning, I cannot call it as a solution, but it is a setting which is needed to be done, particularly for executing the Midlets. Just putting here what I did.... Select the project in your JDE, Right Click on it, then select the "Application" tab, then change the Project Type to "Midlet", then click OK. That’s it. Clean and Build the project, now it will not show the warning.
Thursday, December 2, 2010
Warning: No definition found for exported static routine: .main(String[])
To get rid of this warning, I cannot call it as a solution, but it is a setting which is needed to be done, particularly for executing the Midlets. Just putting here what I did.... Select the project in your JDE, Right Click on it, then select the "Application" tab, then change the Project Type to "Midlet", then click OK. That’s it. Clean and Build the project, now it will not show the warning.
Installation Failed: Error 907 Invalid JAR illegal host string: starts with ‘/’
This error may occur, while installing the mobile application whose name is same as the application which is already installed on the mobile device. When it asks whether to overwrite the existing application which is installed on the mobile device, and even if you select YES, still this error may occur.
Installation Failed: Error 907 Invalid JAR output file: -1.cod code section too large: 65432 bytes
This error comes when one or more classes in your application produce more than 64K byte code. IE there is a limit of 64K for each COD file. It is good idea to create number of small classes instead of creating very large single class.
Installation Failed: Error 907 Invalid JAR Error: Control flow verification information too large: commandAction
This error occurs at the time of installing a mobile application on a device if any method in your application is very big and lengthy. From the error, it is self explanatory. To sort out this error, you have to go on reducing the method. For this you can remove the repetitive statements from the method and place them in a separate method, and then calling that method into the bigger one.
Installation Failed: Error starting xxx: Class 'xxx.xxx' ref member out of range
Reducing the number of class level variables will sort out this error. Many devices have a limited memory allotted to declare the class level variables. But remember, this limit is not for an application, but for each class in your application. In short, instead of defining all the class level variables in a single class, it is recommended that you create several classes and distribute your class level variables in all these classes. So the above error will occur when, class level variables in any of your classes in your application has occupied more memory than the allowed for each class. Please also note that, this limitation is for class level variables and not for local variables those you declare inside any method.
Errors, Exceptions and Problems in Mobile Application Development and Its Installation on Mobile Devices
Like a newbie, I also have started developing application and go on implementing code after code as per requirement and ultimately finished my application development. My application was fully developed with great efforts and it was running perfectly fine as expected on emulators, I have tested it vigorously to make it bug free. Then I wanted to install and test it on actual mobile device. I followed all the necessary steps of installing mobile application on the device, but I was failing again and again with various kinds of errors which I had never seen in my life. At first glance, I thought it is a small problem. After taking guidance from some experts on the various forums, I have decided to alter my application. It was really annoying to make changes in the already developed application. But there was no other option left for me.
I started resolving errors after errors. I came to know that I was totally wrong about the problem that I thought it was a small problem.
When you start installing mobile application on a mobile device, the application is verified first. There are various criteria defined by the device vendor. These criteria varies vendor to vendor, and device to device of the same vendor. On the basis of these criteria, the application is checked at the time of installation on the mobile device. If application fulfills all the criteria set by the device vendor for that particular device, the application is marked as verified and then installation proceeds further.
Really I was totally unaware of various physical limitations like method should not be too long, there should be limited number of variables, size of COD should not be more than 64KB etc. So I decided to share my experience, what I did to sort out these errors. It may be possible that I might have not experienced the errors which you are facing, and vice-versa. Sorry about that.
My development environment was NetBeans IDE and BlackBerry JDE. I tested my application on various BlackBerry emulators. I tried installation on mobile device BlackBerry 8520 Curve Smart Phone.
So, below are the links of errors which I have faced and solution to sort out those errors:
Installation Failed: Error starting xxx: Class 'xxx.xxx' ref member out of range
Installation Failed: Error 907 Invalid JAR Error: Control flow verification information too large: commandAction
Installation Failed: Error 907 Invalid JAR output file: -1.cod code section too large: 65432 bytes
Installation Failed: Error 907 Invalid JAR illegal host string: starts with ‘/’
Warning: No definition found for exported static routine: .main(String[])
Whenever I’ll face any Errors and Exceptions, I’ll share my experience and keep updating this list.
Tuesday, November 23, 2010
Java Power
Now, this is the world of competition, and technology plays an important role in the betterment of life on earth. If we look in to the future, technology will be the power and human brains are the driving forces behind that. Programming will be the major aspect of every technology.
JAVA is much ahead of all of its counterpart technologies. Its flexibility is its power.
There were five primary goals in the creation of the Java language:
JAVA is much ahead of all of its counterpart technologies. Its flexibility is its power.
There were five primary goals in the creation of the Java language:
- It should use the Object Oriented Programming methodology.
- It should allow the same program to be executed on multiple Operating Systems
- It should contain built-in support for using Computer Networks
- It should be designed to execute code from Remote Source securely.
- It should be easy to use by selecting what were considered the good parts of other object-oriented languages.
Java is a object oriented programming language originally developed by Sun Microsystems and released in 1995 as a core component of Sun Microsystems Java Platform. The language derives much of its syntax from C and C++ but has a simpler Object Model and fewer low-level facilities. Java applications are typically compiled to byte code that can run on any Java Virtual Machine (JVM) regardless of Computer Architecture.
The original and reference implementation Java compilers, virtual machines, and class libraries were developed by Sun from 1995. As of May 2007, in compliance with the specifications of the Java Community Process, Sun made available most of their Java technologies as free software under the GNU General Public License. Others have also developed alternative implementations of these Sun technologies, such as the GNU Compiler for Java and GNU Classpath.Sun has defined three platforms targeting different application environments and segmented many of its APIs so that they belong to one of the platforms. The platforms are:
- Java ME i.e. Java Platform, Micro Edition — targeting environments with limited resources,
- Java SE i.e. Java Platform, Standard Edition — targeting workstation environments, and
- Java EE i.e. Java Platform, Enterprise Edition — targeting large distributed enterprise or Internet environments.
Friday, October 29, 2010
J2ME Slider – Creating Slider Item Using Custom Item in J2ME
How to use Custom Items in Java ME? Developing Custom Designed Items using Custom Items, Sliders in J2ME, Sliders in Java ME, Designing sliders using Custom Items, How to create a slider item in J2ME?…. If you are searching solutions for such queries then you are on the right page.
Today, most of the mobile applications widely use sliders. But it is really very strange that J2ME or Java ME API provided by SUN Microsystems [now ORACLE] doesn’t have the any item such as SLIDERS.
But again thanks to Java Developers for providing Custom Item.
Instead of writing so much on Custom Item, we’ll straightway start the coding. I have written a generalized Slider Component using Custom Item. This class can be used directly in any java mobile application development as it is. Creating an object is super easy as below
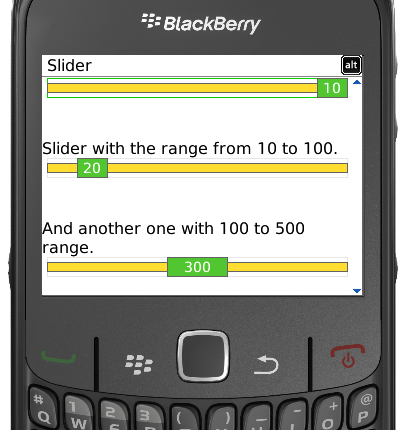
CustomSliderItem mySlider1 = new CustomSliderItem(1, 10, 1, 300);
CustomSliderItem mySlider2 = new CustomSliderItem(10, 100, 10, 300);
CustomSliderItem mySlider3 = new CustomSliderItem(100, 500, 100, 300);
And on testing it on BlackBerry 8520 Curve Smartphone, it looks like as below.

If you like this Slider, you can use it in your code too. I have provided methods to change the Slider color as well as Handle color, so that you can have freedom of using your desired color. I hope you will enjoy using this slider. Below is the code.
import javax.microedition.lcdui.Canvas;
import javax.microedition.lcdui.CustomItem;
import javax.microedition.lcdui.Font;
import javax.microedition.lcdui.Graphics;
/** @author Nikhil Shravane */
public class CustomSliderItem extends CustomItem{
int sliderH, sliderW;
int sliderBorderColor_R, sliderBorderColor_G, sliderBorderColor_B;
int sliderColor_R, sliderColor_G, sliderColor_B;
int handleH, handleW;
int handleBorderColor_R, handleBorderColor_G, handleBorderColor_B;
int handleColor_R, handleColor_G, handleColor_B;
int lower, higher, incrementOffset;
int handleValue;
int blockWidth;
CustomSliderItem(int lower, int higher, int incrementOffset, int sliderW){
super(null);
this.lower = lower;
this.higher = higher;
this.incrementOffset = incrementOffset;
this.sliderW = sliderW;
this.handleValue = lower;
initializeSlider();
}
protected void initializeSlider(){
sliderH = getMinContentHeight() - 1;
//sliderW = getMinContentWidth() - 1;
handleH = sliderH;
handleW = sliderW/(higher/incrementOffset);
blockWidth = sliderW/(((higher-lower)+incrementOffset)/incrementOffset);
sliderColor_R = 255;
sliderColor_G = 219;
sliderColor_B = 51;
sliderBorderColor_R = 100;
sliderBorderColor_G = 100;
sliderBorderColor_B = 100;
handleColor_R = 80;
handleColor_G = 198;
handleColor_B = 51;
handleBorderColor_R = 100;
handleBorderColor_G = 100;
handleBorderColor_B = 100;
}
protected int getMinContentHeight() {
return 20;
}
protected int getMinContentWidth() {
return GUI_n_Screen.SCR_WIDTH;
}
protected int getPrefContentHeight(int width) {
return getMinContentHeight();
}
protected int getPrefContentWidth(int height) {
return getMinContentWidth();
}
protected void traverseOut()
{
slectedColor_R = 230;
slectedColor_G = 230;
slectedColor_B = 230;
repaint();
System.out.println("traverse out");
}
public void setSliderColor(int r, int g, int b){
this.sliderColor_R = r;
this.sliderColor_G = g;
this.sliderColor_B = b;
}
public void setSliderBorderColor(int r, int g, int b){
this.sliderBorderColor_R = r;
this.sliderBorderColor_G = g;
this.sliderBorderColor_B = b;
}
public void setHandleColor(int r, int g, int b){
this.handleColor_R = r;
this.handleColor_G = g;
this.handleColor_B = b;
}
public void setHandleBorderColor(int r, int g, int b){
this.handleBorderColor_R = r;
this.handleBorderColor_G = g;
this.handleBorderColor_B = b;
}
public void setHandleValue(int value){
this.handleValue = value;
}
public int getHandleValue(){
return this.handleValue;
}
protected void paint(Graphics g, int w, int h) {
//Show selection and deselection on travesring
g.setColor(slectedColor_R, slectedColor_G, slectedColor_B);
g.drawRect(0,0,sliderW, sliderH);
//Design Slider
g.setColor(sliderColor_R, sliderColor_G, sliderColor_B);
g.fillRect(0,5,sliderW, sliderH-10);
g.setColor(sliderBorderColor_R,sliderBorderColor_G,sliderBorderColor_B);
g.drawRect(0,5,sliderW, sliderH-10);
//Design Handle
g.setColor(handleColor_R, handleColor_G, handleColor_B);
g.fillRect(((handleValue/incrementOffset)-1) * handleW,0,handleW, handleH);
g.setColor(handleBorderColor_R, handleBorderColor_G, handleBorderColor_B);
g.drawRect(((handleValue/incrementOffset)-1) * handleW,0,handleW, handleH);
//Show Value
g.setColor(255,255,255);
g.setFont(Font.getFont(Font.FACE_PROPORTIONAL, Font.STYLE_PLAIN, Font.SIZE_SMALL));
int strLength = g.getFont().stringWidth(handleValue+"");
g.drawString(handleValue+"", (((handleValue/incrementOffset)-1)*handleW) + (handleW/2) - (strLength/2), 1, Graphics.LEFT | Graphics.TOP);
}
int slectedColor_R = 230, slectedColor_G = 230, slectedColor_B = 230;
protected boolean traverse(int dir, int viewportWidth, int viewportHeight,
int[] visRect_inout) {
System.out.println("traverse");
slectedColor_R = 12;
slectedColor_G = 202;
slectedColor_B = 0;
switch(dir){
case Canvas.DOWN:
repaint();
return false;
case Canvas.UP:
repaint();
return false;
case Canvas.RIGHT:
if(handleValue < higher)
handleValue = handleValue + incrementOffset;
repaint();
return true;
case Canvas.LEFT:
if(handleValue > lower)
handleValue = handleValue - incrementOffset;
repaint();
return true;
default: return false;
}
}
protected void pointerDragged(int x, int y) {
int temp = 0;
handleValue = (int)Math.floor(x/blockWidth)+1;
if(handleValue <= higher){
System.out.println("HandleValue: " + handleValue);
if(temp != handleValue)
repaint();
temp = handleValue;
} else {
handleValue = higher;
//System.out.println("HandleValue: " + handleValue);
}
}
}
Hey, please don’t forget to drop your comments if you like it and your suggestions if you don’t. Enjoy!
Thursday, June 10, 2010
Before Starting Mobile Application Development...
Beginning with mobile application development, how to start mobile application development, tips and tricks in mobile applications development, installing midlets on the mobile devices, do’s and don’ts while developing midlets, necessary precautions while developing mobile application – if these are the queries in your mind, then you are on the right page.
I am also a new mobile application developer, and I have faced too many problems to make my midlet run on the actual device. So I thought I should share my experience, as I didn’t get this information at one place. Of course I got this information from the various forums. I begin with special thanks to all the techies who have helped me to sort out my problems.
Before you go ahead, it is expected that you know the technical terms and information related to the mobile domain. This includes different types of configurations and their uses, various Profiles and their uses, various technologies in the market and technical advancement in its various versions etc. Before starting your application you should know which technology, configuration and profile you are going to use.
So before you start writing your mobile application, please keep following points in your mind.
1. You are going to develop an application for a mobile device, which is far different from the desktop applications and web applications.
2. There are lots of limitations in terms of resources like persistent storage; run-time memory, display area etc. are few of many.
3. While developing, you have to keep in mind that you are developing an application for an “end user”.
4. User will like your application, only when he will have to press as less as keys.
5. Try to use long animations and splash screen as less as possible. Looking at them many times, he may get irritated.
6. If application is going to connect server, try to make the connections as less as possible. For example: If you are developing application of Question – Answer type, then there is no point in connecting to server for every question to fetch and submit answer. It takes considerable time to connect to the server and get the response from it.
7. Think lot before starting the actual development.
8. Keep all the points in mind always.
I am sure that the points I mentioned above are few of many, but sufficient for starters.
I have not used any vendor specific APIs, I purely used Java ME APIs while developing my mobile application, because I want my application cross-platform i.e. it should work on any mobile supporting Java. Like a newbie, I went on adding the number of forms and number of components on each form. As a result of which my code size became very big, and my code lines are in few thousands. On emulator it worked fantastic, so I thought now I should install it on my device. But at the time of actual installation, it has given me so much pain.
If you don’t want to face such problems, try to practice following points from the very beginning.
1. Try to use as less as possible class level variables or data members. On BlackBerry there is a limit which specifies that total size occupied by all your class level data members should not be more than the upper limit of 512 words. The data item double and long will take 2 words. Please check the exact limit if there any on your device. For that you have to ask your queries into the technical forums related to your mobile vendor like Samsung or Nokia.
2. Try to make many smaller classes instead of only one very big class, so that your class level data members will be distributed among various classes, resulting one class will have less number of class level data members.
3. This limit refers to the number of variables within a single class, not within your application. You can break your code into multiple classes as mentioned above.
4. Try to make many smaller methods instead very big and very long single method, and call the methods within methods to reduce the size of single long method.
5. Try to give the smaller names to your classes, forms and various data members.
6. Try to achieve relevancy while giving names to every variable, like for example: f1Q1, f1Q2, f1Q3 etc. which tells me that Form 1 – Question 1, Form 1 – Question 2, Form 1 – Question 3. I realized the importance of this, when I found myself in trouble. I will specify it later, why it is so important.
7. If you are planning to develop server based database oriented mobile application, i.e. HTTP request-response based application, then try to design the application in such a way that most of the calculation, data manipulation, parsing of strings etc. should go on server side, and no or very limited calculations on application side.
If you are planning to develop a mobile replica of an already popular and well designed desktop application, then it is not necessary that the mobile application will also perform well in the real world. I think good mobile applications are more than just providing all the functionality and qualities that the desktop application provides, it is about balancing the device limitation, user environment and the needs of the user.
Mobile applications should be designed to make life easier and stress-less.
Mobile applications should be developed to save users time and efforts.
Mobile hand-held devices have lots of limitations which are also gets directly imposed on the mobile application, which restricts the freedom of developers.
Applications should try to minimize the dependencies to achieve the feeling of freedom in the users’ mind, which will ultimately make the application popular and workable. Users in the today’s world mostly dependent on the internet, but mobile applications may get failed even if it is greatly designed, due to poor coverage of the network. Application should work even without internet using locally stored data, as many times there may be poor network.
There may be few more points to be there in the above list, but at the moment they are sufficient. I will try to add more points to that list as my experience goes on increasing.
Thanks for visiting this page.
Saturday, March 20, 2010
Integrating BlackBerry Emulator with the NetBeans IDE
By reading this you can be able to integrate BlackBerry Emulator 8530, 9500, 9530 to the NetBeans IDE. Emulator 8530 can also be used for 8520.
There is a considerable market share of BlackBerry Hand-held devices through out the globe, so I think developing applications for BlackBerry Devices is an interesting thing for developers. Now many mobile vendors have started giving support to Java as well, as there is a huge market for Java applications. They are popular because they are cross-platform. And I think NetBeans is a quiet old and so much matured IDE for Java Development, which makes it very popular among the developers.
Though I have a few years of experience in Java development, I am very new to
Integrating BlackBerry Emulator 9500 with the NetBeans IDE:
1. Download and install BlackBerry JDE 4.7.0. After installation path will look like as follows:
C:\Program Files\Research In Motion\BlackBerry JDE 4.7.0
2. Download NetBeans IDE. I have download and installed the NetBeans IDE 6.8.
3. Open a new text file and paste the XML file from the following link.
Note: You will need to copy XML code from the link below as I am not able to post the edited XML code on this blog. I hope you will do the changes in it as I will specify below.
http://docs.sun.com/app/docs/doc/820-3753/ghjjt?a=view
You will need to edit this XML file properly
Instead of 8800, you will need to place the 9500. So just find 8800 and replace it with 9500.
Please also find and change the following:
platform name="BlackBerry_JDE_470"
               home="C:\Program Files\Research In Motion\BlackBerry JDE 4.7.0"
device name="9500"
description="9500"
4. Name this XML file as RIM_BB_9500.xml and place it to the following path:
C:\Documents and Settings\local-user-name\.netbeans\6.8\config\Services\Platforms\org-netbeans-api-java-Platform
5. Start NetBeans IDE. Note: If your NetBeans is already running, then please close it and again restart it.
6. In your NetBeans IDE, right Click on your project in the Projects tab, then Properties, which will open a window with your application name as a title.
7. Then select RIM_BB_9500 from the drop down list in the Emulator Platforms.
8. Select Device 9500 from the drop down list.
9. Click OK. Note: You may require adding the libraries by checking the check boxes in the optional package area, as per your projects requirement.
10. That’s it, run your application, BlackBerry emulator for device 9500 will be opened.
____________________________________________________________________________________________
Special Note: Integrating BlackBerry Emulator 9530 with the NetBeans IDE
You can also use the Emulator 9530 using the same file above. Only you will need to perform few simple steps as below:
a. Keep above XML i.e. RIM_BB_9500 file as it is, just copy it and paste it in the same directory as mentioned in the step 4 above, and rename it as RIM_BB_9530.xml.
b. Open the newly created file, then Find all the occurrences of 9500 and Replace them all with 9530.
c. Save it, and that’s it. Another Emulator is ready for you.
____________________________________________________________________________________________
Integrating BlackBerry Emulator 8530 with the NetBeans IDE:
I have a BlackBerry 8520 Curve
11. Download and install BlackBerry
C:\Program Files\Research In Motion\BlackBerry Smartphone Simulators 5.0.0
12. Then copy the folder 5.0.0.386 (8530) from above path, and paste it into your simulator folder of the JDE. IE copy this folder to the following path:
C:\Program Files\Research In Motion\BlackBerry JDE 4.7.0\simulator
13. Then again you have to do, not exactly the same but something similar as mentioned in the special note above like:
a. Keep above XML i.e. RIM_BB_9500 file as it is, just copy it and paste it in the same directory as mentioned in the step 4 above, and rename it as RIM_BB_8530.xml.
b. This step has been changed a bit.
Instead of device name="9500" & description="9500", Do both 8530.Or if you have copied XML directly from the link I have provided, then there will bedevice name="8800" description="8800", you should edit them to 8530.runcmd="cmd /C "cd /D {platformhome}{/}simulator&{device}""
And replace it with
runcmd="cmd /C "cd /D {platformhome}{/}simulator{/}5.0.0.386 (8530)&{device}""
Here you go… Now you have an emulator platform ready to execute your Java Mobile applications.
I could do all the steps and show it here the actual edited XML file, but due to some reason this site wont allow me to post XML and HTML codes. I tried doing so but couldn't succeeded to post the XML files. Sorry about that. But I am sure you can do those simple editing stuff as I mentioned above.
____________________________________________________________________________________________
In Short, you will need to edit carefully the following tags and their respective Properties in the XML file:
platform Tag: name, home, displayname, runcmd.
Device Tag: name, description.____________________________________________________________________________________________
As now, you have integrated the Emulator with the NetBeans IDE, now you have to perform few more steps to buildand run your project. For that please follow the steps below.
14. You will need to download the MEP client. Please go to the link, submit the required information and download sgmp-client-1_1_01-fcs-b02.zip bundle.
15. Unzip the bundle somewhere, I preferred C:\
16. In the NetBeans, Add mep_client_api.jar to your project as a supported Libraries & Resources. Please follow the steps below.
a. In the Projects tab, Right-Click on your project and select the Properties
b. Click Libraries & Resources
c. Click Add Jar/Zip
d. Browse to the location of the unzipped bundle and add the mep_client_api.jar. For example, I have unzipped the bundle to C:\ drive, and the path looks as
C:\sgmp-client-1_1_01-fcs-b02\lib\BlackBerry\mep_client_api.jar
e. Click OK.
f. Click on the Files tab, just next to Projects tab and open the project.properties file under the nbproject directory.
g. Edit [or add if not present] the file.reference.mep_client_api.jar property to contain the fully qualified path name of the mep_client_api.jar file. For example,
file.reference.mep_client_api.jar=C:/sgmp-client-1_1_01-fcs-b02/lib/BlackBerry/mep_client_api.jar
Please use forward slashes [/]
17. Now, Click the Files tab and open the build.xml file. Now again as I am not able to post XML code here, you will need to copy it from the link below and add the code immediately before end of the </project> tag at the end of the file.
[From the link above, copy the XML code snippet from the point number 9.]
____________________________________________________________________________________________
Note: For the emulator 8530, add /5.0.0.386 (8530) in front of {platform.home}/simulator wherever it is found in the XML code above; so that it will look like as {platform.home}/simulator/5.0.0.386 (8530)
____________________________________________________________________________________________18. Create an .alx file for your project.
a. Click the Files tab.b. Right-click on your project and select New -> Other.c. In the Choose File Type screen, click Other, then click Empty File.d. Click Next.e. In the Name and Location screen, give the file the same name as your project, with the extension .alx.For example, if bb-secure-musicdb is the project name, name the file bb-secure-musicdb.alx.f. Click Finish.g. The empty file opens. Copy the XML code snippet from the point number 10 g from the same link I have provided just above for (17), and paste into the file, h. Replace myProject with your project name, and including any vendor and copyright information needed for your application.i. Save and close the file. 19. Copy the file mep_client_api.cod from the directory C:\sgmp-client-1_1_01-fcs-b02\lib\BlackBerry to the simulator directory of the BlackBerry JDE (for example, C:\Program Files\Research In Motion\BlackBerry JDE 4.7.0\simulator). 20. Click the Projects tab, then right-click on your project and select Clean & Build. 21. Right-click on your project and select Run. The BlackBerry Device Emulator will appear on your screen. Click on the Menu Button on the emulator, go to the Downloads, then you will find your application in the list. Click on it, and your application will run.____________________________________________________________________________________________
I hope it will work for you also, all the best.
Subscribe to:
Posts (Atom)